SUBJECT VEHICLE: 2006-08 Isuzu Ascender.
RELEARN PROCEDURE? Yes.
SPECIAL TOOLS NEEDED? No.
The tire pressure monitoring system (TPMS) on 2006-08 Isuzu Ascenders warns the driver when a significant loss of tire pressure has occurred in any of the four tires. It allows the driver to display the individual tire pressures and their locations on the Driver Information Center (DIC) while the vehicle is being driven.
The TPMS uses the Powertrain Control Module (PCM), the Body Control Module (BCM), the Instrument Panel Cluster (IPC) the DIC, the Endgate Module (EGM) on models with power sliding rear roof or Liftgate Module (LGM) on all other models. A Radio Frequency (RF) transmitting pressure sensor in each wheel/tire assembly, and the serial data circuit perform the system functions.
The EGM/LGM receives and translates the data contained in each sensor transmission, then sends the tire pressure and tire location data to the DIC. When the system detects a significantly under-inflated tire pressure, a “Check Tire Pressure” message is displayed on the DIC.
To remove an old sensor, follow these steps.
1. Raise the vehicle on a suitable support. Remove the tire/wheel assembly from the vehicle.
2. Demount the tire from the wheel following the tire changer manufacturer’s instructions while paying special attention to the following to avoid damaging the tire pressure sensor.
a. Place the sensor’s cap and valve on a dry, clean surface after removal. The cap is aluminum and the valve is nickel-plated to prevent corrosion. DO NOT substitute a cap or valve made of any other material.
b. Position the bead breaking fixture 90 degrees from the valve stem when separating the tire bead from the wheel.
c. Position the mounting/demounting head so the tire iron (or pry bar) can be inserted slightly clockwise of the sensor body when prying the tire bead up and over the mounting/demounting head.
d. Using a tire machine rotate the tire/wheel assembly clockwise when transferring the tire bead to the outside of the wheel rim.
e. Repeat for the inner bead.
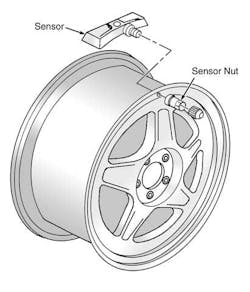
3. Remove the tire pressure sensor nut. See Figure 1.
4. Remove the sensor from the wheel hole.
5. Remove the sensor grommet from the valve stem.
Clean debris before installation
To install a new sensor, follow these steps.
1. Clean any dirt or debris from the grommet sealing areas. Install the grommet on the sensor valve stem.
2. Insert the sensor in the wheel hole with the air passage facing away from the wheel.
3. Install the sensor nut, and position the sensor body parallel to the inside wheel surface while tightening the nut to 62 in.-lbs. NOTE: A replacement tire pressure sensor is shipped in OFF mode. In this mode, the sensor’s unique identification code cannot be learned into the EGM/LGM’s memory. The sensor must be taken out of OFF mode by spinning the tire/wheel assembly above 20 mph for at least 10 seconds on order to close the sensor’s internal roll switch.
4. Before installing the tire on the wheel, note the following items to avoid tire pressure sensor damage upon tire mounting.
a. Position the mounting/demounting head 180 degrees from the valve stem.
b. Position the bead transition area 45 degrees counterclockwise of the valve stem.
c. Using a tire machine rotate the tire/wheel assembly clockwise when transferring the tire bead to the inside of the wheel rim.
d. Repeat items for the outer bead.
5. Install the tire on the wheel. Install the tire/wheel assembly on the vehicle. Retrain the tire pressure sensor.
NOTE: When the wheels have been rotated, or a tire pressure sensor or EGM/LGM has been replaced, retrain the tire pressure sensor.
Retrain for optimal performance
When the tire pressure warning light illuminates and a warning message appears on the DIC, immediately check the air pressure of all tires and adjust to the specified pressure.
The DIC will say “SERVICE TIRE MONITOR” if a sensor needs retrained.
To retrain a new sensor, follow these steps.
1. Turn the ignition to the ON position, with the engine off. Apply the parking brake.
WARNING: Overinflating tires may cause personal injury or damage to the tires and wheels.
When increasing tire pressure, do not exceed the maximum inflation pressure as noted on the tire sidewall.
2. Turn the headlight switch from OFF to parking lamps four times within four seconds. A double horn chirp will sound and the low tire pressure indicator will begin to flash to indicate the learn mode has been enabled.
3. Starting with the left-front tire, increase or decrease the pressure for eight to 10 seconds or until a horn chirp sounds. The horn chirp may occur before the eight to 10 second pressure increase/decrease time period has been reached, or up to 30 seconds after the eight to 10 second pressure increase/decrease time period has been reached.
4. After the horn chirp has sounded, proceed as in step 3 for the next three sensors in the following order: right-front, right-rear and left-rear.
5. After the left-rear sensor has been learned, turn the ignition switch to the OFF position to exit the learn mode. Adjust all tire pressures to specification. ■
Information for this column comes from Mitchell 1’s ”Tire Pressure Monitoring Systems Guide” for domestic and import vehicles through 2010. Headquartered in Poway, Calif., Mitchell 1 has provided quality repair information solutions to the automotive industry for more than 80 years. For more information, visit www.mitchell1.com.


