DESCRIPTION AND OPERATION
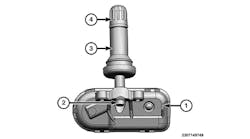
The Tire Pressure Monitoring System (TPMS) monitors air pressure in the four road tires. Pressure in the spare tire is not monitored.There are two tire pressure monitoring systems available, a base system and a premium system. Unlike the Premium system, the base system does not specify how many tires are low or where they are located. Both systems consist of tire pressure monitoring sensors attached to each road wheel through the valve stem mounting hole and a TPMS module.
The receiver circuit for the system is mounted in the right rear wheel opening. The module is fixed to a metal bracket mounted to the inner wheel opening located behind the splash shield. The module decodes the RF signals transmitted by each of the vehicle's tire pressure sensors. The decoded information is used to determine if "warning" or "fault" conditions exist within the TPMS. Upon detection of a warning or fault condition, the system will send a request to the module that controls the indicator lamp and the text display via the vehicle bus system to illuminate or flash the indicator lamp. Upon detection of a warning or fault condition, the electronic display will send a request to sound the "chime." If the TPMS module detects that the tire pressure in any road tire is going low, beyond the Low Pressure (lamp) ON threshold (see placard table), a chime will sound and the indicator lamp will turn on. In addition to the chime and lamp, a graphic display of the pressure value(s) and position of the low tire(s) will flash in the Electronic Vehicle Information Center (EVIC).
Once pressure in the suspect tire(s) raises above the Low Pressure (lamp) OFF Threshold, and the TPM module receives a valid transmission from the sensor, the lamp will go out. If a system fault is detected due to a missing sensor signal, in addition to a chime and a indicator lamp flashing, a "Check TPM System" text message will be displayed in the instrument cluster, and the tire pressure graphic display will have "- -" in place of the pressure value. After the flash sequence, the indicator lamp will remain illuminated. The system will return to normal once the TPMS module receives a valid transmission from that sensor location. If a system fault is detected, the indicator lamp will flash on/off for 75 seconds and then remain on.
The TPMS will continue to warn the driver of low tire pressure as long as the condition exists, and will not turn off the indicator lamp until the tire pressure is at or above the Low Pressure (lamp) OFF threshold. The system will automatically update and the TPMS indicator lamp will turn off once the updated tire pressures have been received. Tire pressure will vary with temperature by about 1 psi for every 12 degrees Fahrenheit. Tire pressure should always be set based on cold inflation tire pressure (placard pressure). This is defined as the tire pressure after a vehicle has not been driven for more than three hours (and in outside ambient temperature). The tire pressure will also increase as the vehicle is driven; this is normal and there should be no adjustment for this increased pressure. For a system fault, the system will return to normal once the module receives a valid transmission from that sensor location.
TIRE PRESSURE SENSOR LEARNING
The TPMS module will store all warning and fault conditions, placard pressure values and low pressure threshold values (lamp ON and OFF) in memory that can be accessed through diagnostic communication. If new sensors are introduced to the vehicle, the data stored for the sensor being replaced will be deleted once the new sensor ID has been learned. The module will store all wheel sensor IDs and locations and faults in memory that can be accessed through diagnostic communication. The TPM module automatically learns and stores the sensor IDs while driving —within 20 minutes of consistent driving over 15 mph — after a sensor has been replaced. The learning sequence will initiate when the vehicle has been stopped for more than 20 minutes.
TPMS REMOVAL AND INSTALLATION
REMOVAL
1. Raise and support vehicle.
CAUTION: The cap used on this valve stem contains an O-ring seal to prevent contamination and moisture from entering the valve stem. Do not substitute a regular valve stem cap in its place.
2. Remove tire and wheel assembly.
3. Demount tire from wheel following tire changer manufacturer's instructions while paying special attention to the following to avoid damaging the pressure sensor:
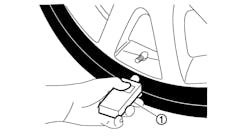
a. When breaking the tire bead loose from the wheel rim, avoid using the bead breaker in the area of the sensor. That includes both outer and inner beads of the tire.
b. When preparing to demount the tire from the wheel, carefully insert the mounting/dismounting tool 280 degrees from the valve stem (plus or minus 10 degrees), then proceed to demount the tire from the wheel. Use this process on both outer and inner tire beads.
4. Remove the valve stem nut and remove the assembly from the wheel.
INSTALLATION
The valve axis and the rim hole axis must be aligned. Ensure here that the sealing element (grommet) makes contact with the sealing surface of the rim hole over its entire circumference.
Installation OK, flat/parallel positioning of the wheel electronics module on wheel well base.
Installation OK, positioning of wheel electronics module on rear edge in wheel well base.
1. Wipe clean the area around the valve stem hole in wheel. Make sure the surface of the wheel is not damaged.
2. Insert the valve stem through the wheel observing all notes above.
3. Insert a suitable tool into the cross hole of the valve head to prevent the valve body from turning.
4. Install the tire pressure sensor nut and tighten to the proper torque specifications.
5. Mount tire on wheel following tire changer manufacturer's instructions, paying special attention to the following to avoid damaging tire pressure sensor:
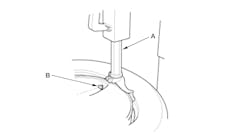
a. Rotating Wheel Tire Changers: Once the wheel is mounted to the changer, position the sensor valve stem approximately 280 degrees from the head of the changer in a clockwise direction before rotating the wheel (also in a clockwise direction) to mount the tire. Use this procedure on both the outer and inner tire beads.
b. Rotating Tool Tire Changers: Position the wheel on the changer so that the sensor valve stem is located approximately 210 degrees clockwise from the installation end of the mounting/demounting tool once the tool is mounted for tire installation. Make sure the sensor is clear of the lower bead breaker area to avoid damaging the sensor when the breaker rises. Rotate the tool in a counterclockwise direction to mount the tire. Use this procedure on both the outer and inner tire beads.
c. Adjust air pressure to that listed on Tire Inflation Pressure Label (placard) provided with vehicle (usually applied to driver's side B-pillar). Make sure original style valve stem cap is securely installed to keep moisture out of sensor.
d. Install tire and wheel assembly on the vehicle.
e. Remove the support and lower the vehicle.
f. Perform one of the following to make the system learn the new sensor ID.
g. Using the TPM-RKE Analyzer 9936 with the scan tool, program the TPMS module with the new tire pressure sensor ID. This is part of the diagnostic verification test.
h. The vehicle should remain stationary for at least 20 minutes. Drive the vehicle for a minimum of 20 minutes while maintaining a continuous speed above 15 mph. During this time, the system will recognize and add the new sensor ID. This is part of the diagnostic verification test.
NOTE: If a sensor cannot be trained, refer to appropriate diagnostic information.
TORQUE SPECIFICATIONS
DESCRIPTION SPECIFICATION
Tire Pressure Sensor Nut 6 N.m (53 In-Lbs)


