DESCRIPTION & OPERATION
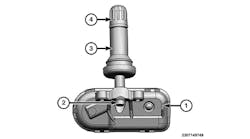
A tire pressure sensor integrated with a valve is installed in each wheel and transmits a detected air pressure signal in the form of a radio wave. The radio signal is received by the remote keyless entry receiver (tire pressure receiver).
When the vehicle has reached a speed of 40 km/h (25 mph) or greater, the BCM (body control module) receives a signal transmitted from the tire pressure sensors installed in each wheel. If the BCM detects low tire pressure or a system malfunction, it sends a signal to the combination meter via CAN communication to illuminate the low tire pressure warning lamp. In addition, a warning message will be displayed in the information display.
TPMS RESET PROCEDURES
TPMS reset operation can set the present tire air content as a TPMS reference value. This procedure must be performed:
- After tire pressure adjustment,
- After tire or road wheel replacement, and
- After performing tire rotation.
1) Push the MENU button and touch "Settings" on the lower display.
2) Touch "Meter" or "Meter Setting".
3) Touch "TPMS Setting".
4) Touch "Tire Pressure Reset".
5) When setting of Tire Pressure Reset, touch select "OK" or "NO".
6) After resetting the TPMS, drive the vehicle at speeds above 25 km/h (16 mph).
NOTE: The TPMS settings are updated to driving.
CAUTION: TPMS detects low tire pressure after this calibration. Before calibration finish, low tire warning lamp does not turn ON. (This is not broken.)
MEMORIZING THE TIRE PRESSURE SENSOR ID
WITH TIRE PRESSURE SENSOR ACTIVATION TOOL (J-45295-A)
1) Turn the ignition switch ON.
2) Using CONSULT, select "WORK SUPPORT" in AIR PRESSURE MONITOR. Then, select "ID REGIST."
3) Select "Start" on "ID REGIST" screen.
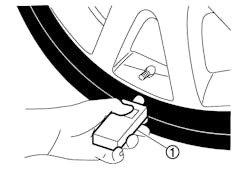
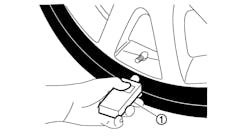
4) Hold the tire pressure sensor activation tool (J-45295-A) against the side of the left front tire, near the valve stem.
5) With the tool held at a 0 to 15 degree angle to the tire, press and hold the tire pressure sensor activation tool button until the indicator lamp turns OFF (approximately 5 seconds).
6) Repeat steps 4 and 5 for the remaining tires in this order: right front, right rear and left rear.
7) When ID registration is complete, check the following pattern at each wheel.
Sequence ID registration position Turn signal lamp CONSULT
1 Front LH 2 blinks "Yet (red)"
2 Front RH "Done (green)"
3 Rear RH
4 Rear LH
8) After the ID registration procedure for all wheels is complete, press "End" on the CONSULT to finish ID registration.
WITH SIGNAL TECH II TOOL (J-50190) — WITH CONSULT
NOTE: The Signal Tech II must be updated with software version 1.1.48 or newer in order to perform the below procedures. The Signal Tech II software updates can only be downloaded from a CONSULT unit with ASIST. Other versions of ASIST will not show the updates.
1) Adjust the tire pressure for all tires to the recommended value.
2) Turn the ignition switch ON.
3) Using CONSULT, select "WORK SUPPORT" in AIR PRESSURE MONITOR. Then, select "ID REGIST."
4) Select "Start" on "ID REGIST" screen.
5) Turn on the Signal Tech II tool (J-50190).
6) Hold the Signal Tech II against the side of the left front tire, near the valve stem.
7) With the tool held at a 0 to 15 degree angle to the tire, select "Activate Sensor" from the main menu, then press and release the "OK" button to activate the sensor. Once the sensor is activated, the vehicle parking lamps will flash and the sensor ID will appear on the CONSULT screen.
8) Repeat steps 6 and 7 for the remaining tires in this order: right front, right rear and left rear.
9) When ID registration is complete, check the pattern from the earlier table at each wheel.
10) Once all sensors have been activated, select "End" on the CONSULT to finish ID registration.
WITH SIGNAL TECH II TOOL (J-50190) — WITHOUT CONSULT
1) Adjust the tire pressure for all tires to the recommended value.
2) Turn on the Signal Tech II tool (J-50190) and select "TPMS Check" from the main menu.
3) Select vehicle model and year.
4) When prompted, hold the Signal Tech II against the side of the left front tire, near the valve stem.
5) With the tool held at a 0 to 15 degree angle to the tire, press and release the "OK" button to activate the sensor. Once the sensor is activated, the tool will sound a tone and the tire pressure will be displayed.
6) Repeat steps 4 and 5 for the remaining tires in this order: right front, right rear and left rear.
7) When prompted, connect the tool to the data link connector. The tool will connect to the TPMS, read the VIN, read sensor IDs and check for TPMS DTCs. Along with DTCs detected, one of the following will be displayed next to each wheel:
- N/A - Not applicable because no ID found by the tool
- OK - Wheel and sensor are in original position
- NEW - New ID found compared to TPMS
- RT - Wheel has been rotated
- Low Press - Low tire pressure
8) If no DTC is present or the repair has been completed, press the "OK" button to register the IDs and clear DTCs.
9) Print a Signal Tech II Audit Report for your records. Refer to the Signal Tech II User Guide for instructions.
TIRE PRESSURE SENSOR REMOVAL AND INSTALLATION
REMOVAL
1) Remove tire assembly.
2) Remove valve cap, valve core and then deflate tire.
NOTE: If the tire is reused, apply a matching mark to the position of the tire road wheel valve hole for the purpose of wheel balance adjustment after installation.
3) Remove valve nut retaining tire pressure sensor and allow tire pressure sensor to fall into tire.
4) Use the tire changer and disengage the tire beads.
CAUTION: Verify that the tire pressure sensor (1) is at the bottom of the tire while performing the above.
- Be sure not to damage the road wheel or tire pressure sensor.
5) Apply bead cream or an equivalent to the tire beads.
6) Set tire onto the tire changer turntable so that the tire pressure sensor inside the tire is located close to the road wheel valve hole.
7) Turn tire so that valve hole is at bottom and bounce so that tire pressure sensor (1) is near valve hole. Carefully lift tire onto turntable and position valve hole (and tire pressure sensor) 270 degree from mounting/dismounting head (2) . – as seen in Fig. 5.
CAUTION: Be sure not to damage the road wheel and tire pressure sensor.
8) Remove tire pressure sensor from tire.
9) Remove the grommet seal.
10) Remove valve stem in the direction shown below.
INSTALLATION
CAUTION: Replace valve stem assembly if the valve stem has deformations, cracks, damage or corrosion.
1) Apply bead cream or an equivalent to the tire beads.
2) Install the tire inside beads onto the road wheel.
3) Install valve stem to tire pressure sensor.
4) Install grommet seal to the tire pressure sensor assembly.
CAUTION:
- Never reuse grommet seal. Insert grommet seal all the way to the base.
5) Follow the procedure below and install the tire pressure sensor to the road wheel.
a) When valve stem assembly is replaced.
1) Set valve stem in the tire pressure sensor.
2) Install the washer (1) in the valve stem, and then install seal (2) in the valve stem. (TYPE 2 only)
CAUTION:
- Check the direction of the seal. The cut part (A) of washer becomes the center of the valve stem.
b) Check the condition of valve stem before installing tire pressure sensor to road wheel.
CAUTION: The base of valve stem (A) must be positioned in the groove of the metal plate as shown below. (See Fig. 9)
c) Hold tire pressure sensor as shown below (See Fig. 10), and press the sensor in the direction shown by the arrows to bring it into absolute contact with road wheel. After this, tighten valve nut to the specified torque.
CAUTION:
- Never reuse valve core and valve cap.
- Check that grommet seal is free of foreign matter.
- Check that grommet seal contacts horizontally with road wheel.
- Check again that the base of valve stem is positioned in the groove of the metal plate.
- Manually tighten valve nut all the way to the wheel. (Never use a power tool to avoid impact.)
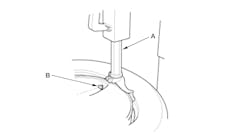
6) Set the tire onto the turntable so that the tire changer arm (2) is at a position approximately 270 Deg. from the tire pressure sensor (1) .
CAUTION: Be sure that the arm does not contact the tire pressure sensor.
7) Install the tire outer side beads onto the road wheel.
CAUTION: When installing, check that the tire does not turn together with the road wheel.
8) Check the tire pressure for all wheels and adjust to the specified value.
NOTE: Before adding air, align the tire with the position of the matching mark applied at the time of removal.
9) Install tire to the vehicle.
10) Perform tire pressure sensor ID registration.
TORQUE SPECIFICATIONS
Description N.m (kg-m, in-lb)
Tire Pressure Sensor Valve Nut 7.7 (0.79, 6.8)


